
Overview
Blackline shows you the differences in a negotiation, so you can see exactly how the wording has changed since the last version. We've added a new, author-aware way of reading those changes: Enhanced review.
The difference is simple. Classic review colours additions and removals, but it doesn't tell you who made each one. Enhanced review attributes every change to the party that made it, colour-codes your changes separately from your counterparty's, and gives you tools to accept or reject each of your counterparty's changes one by one.
You can switch between the two modes at any point during a negotiation, and switching back is instant. Your choice is remembered as your default across all of your negotiations.
Switching between Classic and Enhanced
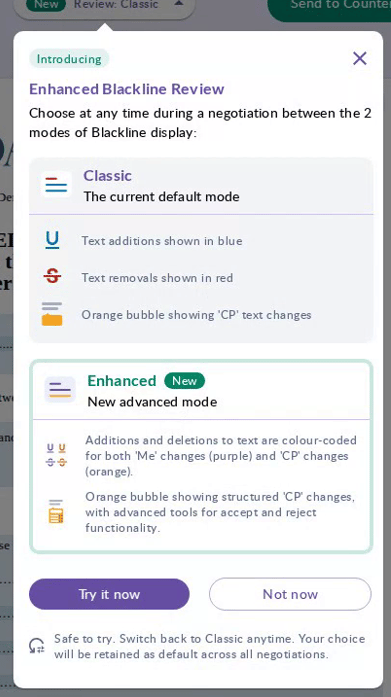
At the top of any negotiation you'll see a button labelled Review: Classic or Review: Enhanced, with a green New chip beside it. Click it to switch between the two display modes.
The first time you open a negotiation, a short explainer appears so you know what you're choosing between:
- Classic - the current default. Text additions shown in blue, text removals shown in red, with an orange bubble showing your counterparty's text changes.
- Enhanced - the new advanced mode. Additions and deletions are colour-coded for both your changes and your counterparty's, and the orange bubble becomes a review panel with tools to accept and reject each change.
Choose Try it now to switch to Enhanced straight away, or Not now to stay on Classic. You can click the button again to change this at any time.
💡Safe to try: You can switch back to Classic at any time, and nothing you've done is lost. Your choice is retained as your default across all of your negotiations, on this browser.
Understanding the colours
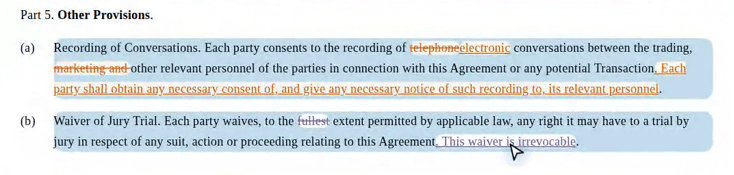
Enhanced review uses colour to tell you at a glance who made each change:
- Purple - your changes ("Me").
- Orange - your counterparty's changes ("CP").
Added text is underlined, and removed text stays visible but is struck through, so you can always see what was there before. A change to formatting shows with a muted background.
Viewing changes across the whole document
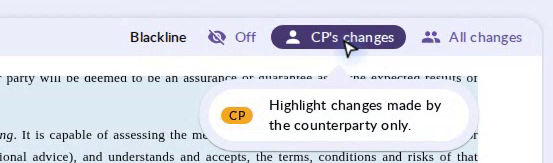
When you're previewing the document, the toolbar has a Blackline control with three settings. Use it to focus on just the changes you care about:
- Off - hides all edit marks and shows the document as it currently stands.
- CP's changes - highlights the changes made by your counterparty only.
- All changes - highlights the changes made by both you and your counterparty.
Reviewing your counterparty's changes one by one
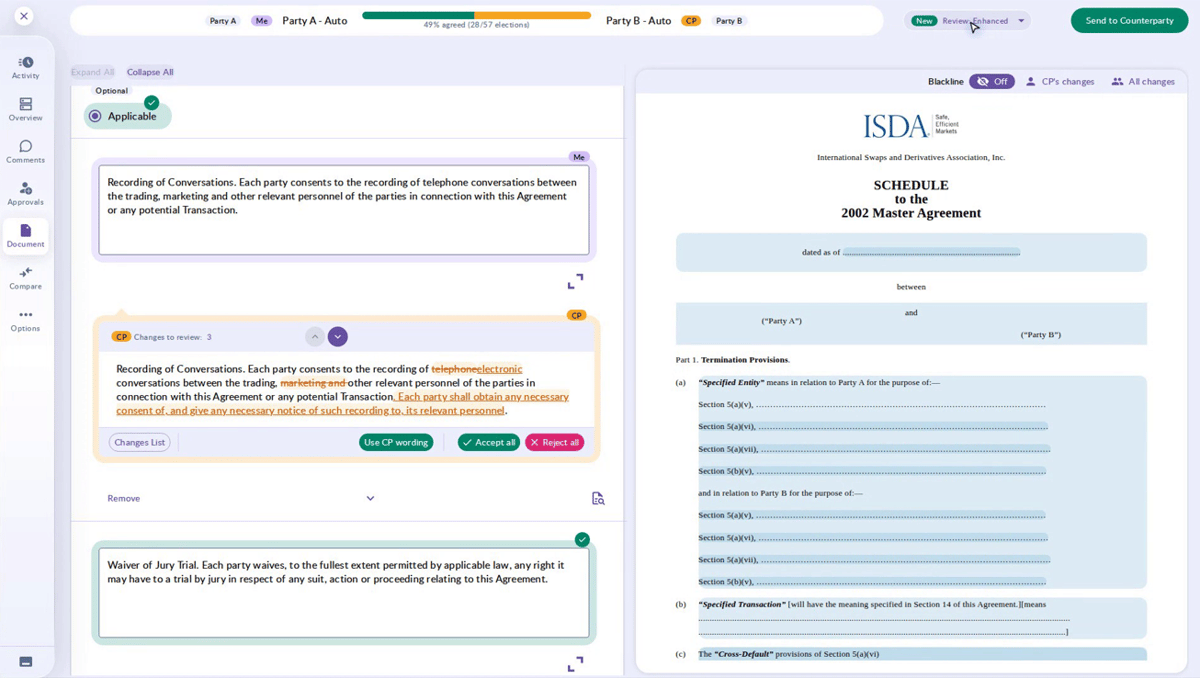
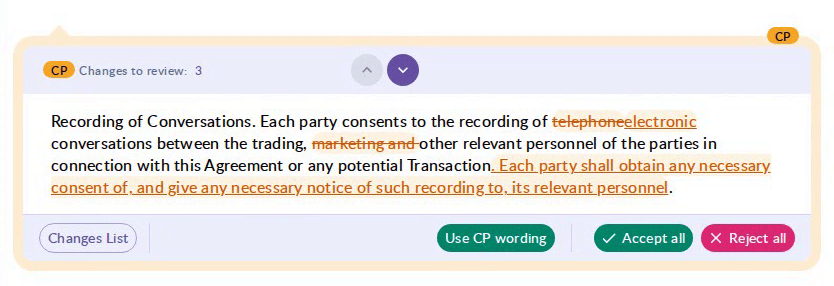
In Enhanced review, the orange CP bubble on a clause becomes a review panel. At the top you'll see a counter, Changes to review: N, with up and down arrows to step through each change in turn.
For each change you have two choices:
- Accept (the tick) - applies your counterparty's wording.
- Reject (the cross) - records your decision and keeps your own wording.
💡 Rejecting never deletes anything. Your wording stays in place, and your counterparty can see that you've rejected the proposed edit. The platform then shows the inverse of the change as a proposal from your side, making it clear that you're proposing it back to your counterparty.
The Changes List
Inside the review panel, the Changes List toggle expands a full list of every individual change on the clause. For each one you can see exactly what was added, removed or replaced, when it was sent, and where it stands:
- Changes you've accepted show a green Accepted chip.
- Changes you've rejected show a Rejected chip.
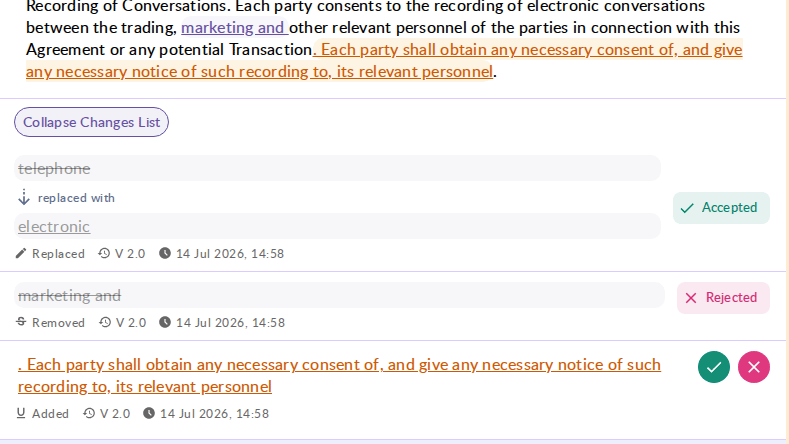
💡Tip: If you edit the text inside a phrase your counterparty changed, that change becomes Altered and can no longer be accepted or rejected on its own. See the FAQs below for why.
Accepting or rejecting everything at once
When you're happy to deal with a clause in one go, you have three bulk actions:
- Accept all - accepts every remaining change on the clause.
- Reject all - declines every remaining change.
- Use CP wording - adopts your counterparty's version of the clause wholesale.
You'll be asked to confirm before any of these actions are applied.
💡 Your individual decisions are safe: once you've accepted or rejected a change by hand, the bulk buttons are disabled for that clause - your individual decisions always take precedence, so decide whether you're reviewing one by one or all at once before you start.


A note on what blackline covers
Blackline applies to the rich-text parts of the document - for example, bespoke wording in Schedule parts, where you and your counterparty type freely. It doesn't apply to structured selections or simple data fields such as names, addresses or dates entered in plain fields, so you won't see tracked changes on those.
Blacklining will show the author-aware blackline in the document preview, making it easy to see who proposed each change.
FAQs
Can I switch back to Classic?
Yes, at any time. Click the Review pill at the top of the negotiation to switch back. Nothing is lost, and your choice becomes your default across all of your negotiations on that browser.
What does rejecting a change actually do?
It records your decision and keeps your own wording. Nothing is deleted, and your counterparty can see the outcome. Accepting, by contrast, applies your counterparty's wording in place of yours.
Why does a change say "Altered"?
If you edit the text inside a phrase your counterparty had changed, that change becomes Altered. Because the wording is no longer exactly what your counterparty proposed, it can't be individually accepted or rejected any more - your edit stands as the current wording.
Why doesn't a plain field show any blackline?
Blackline only tracks changes in the rich-text areas of the document. Simple data fields - names, addresses, dates and similar - aren't blacklined, so you won't see tracked changes there even if the value has changed.
My changes disappeared after I refreshed the page. Where did they go?
They haven't gone anywhere. The document view setting returns to Off on refresh. Open the Blackline control in the toolbar and choose CP's changes or All changes to bring the marks back.
Please watch the below video to guide you through the process.